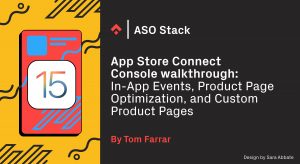
With iOS 16 on the way, here’s a rundown of all you need to know about the current features ahead of the next release. When iOS15 was first launched at the WWDC back in June 2021, it came complete with new console features for mobile marketers to benefit from, namely In-App Events, Product Page Optimisation (PPO), and Custom Product Pages (CPP). These features were designed to boost CVR, enhance engagement and connect with a broader range of users.
Understanding how to use these features is essential for your own mobile growth strategy, and here we present In-App Events, Product Page Optimisation (PPO), and Custom Product Pages (CPP), alongside a Console walkthrough for each of them.
In-App Events
A new way to discover and market apps

Think of In-App Events as a way to promote in-app activity, in real-time. With them, users are able to discover what’s going on within an app as it’s happening. Apple highlights content including challenges, competitions or special launches are solid candidates for successful In-App Events.
In-App Events are also a way to deepen engagement with current audiences, establish connections with new audiences, or reconnect with former users.
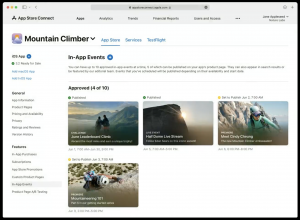
Both app and game developers can create an In-App Event, which will appear in the App Store across the Browse channels (through recommendations, editorials, or featuring), in the search results, and can also appear on the Apps Product Page.
Creating an In-App Event card is easy. In the App Store Connect Console, hit In-App Events under Features, listed beneath your App.

Once in, create the Event Reference name, complete with the metadata, and add the appropriate imagery. From this page, you’re also able to choose the event language, and where the event will be launched whether on a country or a regional level. As a default, the primary In-App Event language is set to the app’s primary language.
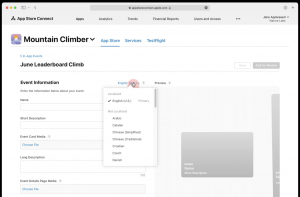
Next, choose the event badge which is the category of the In-App. There are seven event badges to choose from, including Live Events, Major Updates, Competitions, and Premieres.

Once done, the next step is to implement the event’s deep-link, identify the event’s purpose, and outline when the event will take place. Event Start represents when the event will begin within the app, though developers also have to define when the event will finish. The event can last as short as 15 minutes, or as long as 31 days.
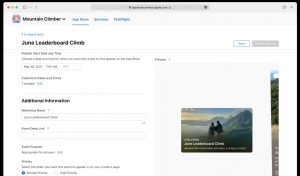
Developers then have to consider when they want their app to appear on the App Store. This is seen in the console at the Event’s Publish Date, which can be set up to 14 days before the event’s start.
Then it’s submitted to the Apple Team for review! Next thing is to wait for the event to go live and then monitor how the In-App Event performed.
Did it bring new users to the app? Did it help regain old users? Did it deepen engagement with the existing audience?
All this information can be found through App Store Connect. Performance data found in App Analytics in App Store Connect showcases metrics including Impressions, Installs, Notify Taps, and App Units which should be analyzed to measure the event’s impact.
With this data, it’s easy to identify which events acquire the most users by viewing the downloads, then filtering by a specific event. To learn where users discover the events, you can see the acquisition sources. It’s also useful to understand how engaging the event was, by deep diving into the engagement data (event impressions, event details page views, app opens). Finally, it’s also possible to analyze how many users chose to be notified when the event starts.
All of this should be repeatedly tested. It’s possible to have up to 10 different events running at the same time, perhaps all experimenting with different audiences to diversify the user network, with the deeper intention and strategy of boosting engagement.
It’s also important to consider ways to promote the In-App Event to reach broader audiences through cross-promotion. Add the app event card link to existing marketing channels whether through socials, emails, etc to maximize the growth potential of this new tool.
To learn more about In-App Events, check out this deep dive put together by Phiture’s ASO Consultant Joy Staples.
Testing Top Tip:
Think about the community that uses your app taking into consideration the diversity and differences within the audience. Once different user types, user groups, and user audiences have been identified (perhaps by market or region), test user-specific In-App Events.
Ensure each event is a different use case for a different user type. Those that engage with the In-App Event will be among the most valuable users within the community. This can then shape additional In-App Event tests to further deepen engagement, whilst also surfacing new app features based on engaged users’ needs. When done correctly, In-App events will not only deepen community but play a role in shaping the longer-term app strategy.
Product Page Optimisation
A/B Testing on the App Store.
With PPO, developers can now test different elements of their app, to identify what drives the highest rates of CVR, and ultimately boosts app engagement.
For example, it’s now possible to showcase different value propositions in the App Store to see which drives the most downloads. This can also be location-specific, with PPO allowing tests to distinguish if different features of an app are more relevant in different markets.
It’s possible to test different App Icons, testing different app screenshots, launch season-specific tests as well as testing new previews all to develop a higher rate of conversion.
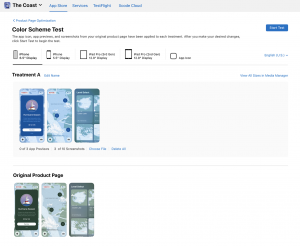
Note, it’s possible to test up to three variants (Apple calls them Treatments) against the Original Product Page.
With each test – developers are able to contrast how a variant performs in contrast to the Original Product Page, which provides new insights to further optimize the Store Listing.
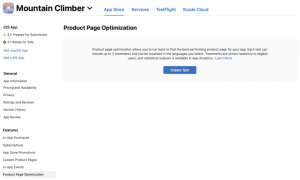
Setting up a PPO test in App Store Connect is easy.
In the console, under features, hit Product Page Optimization. Then, create a reference name. It’s recommended to name it something related to what is being tested so it’s easy to identify later in App Analytics. Now choose how many Treatments (variants) you would like to be tested. Though testing up to three is possible, remember, the more variants, the longer the wait for results.
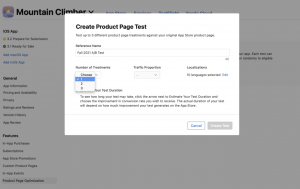
Next, it’s time to decide on the traffic proportion. This is the random audience split between who will see a tested variant (treatment), as opposed to those who will see the Original Product Page. It would be possible to split the audience in half if one variant was being tested; 50% of the audience see the Original Product Page whilst 50% of the audience see the tested variant. It’s worth noting that people will see the same variant whenever they visit the App Store, throughout the duration of the test.

Finally, finalize the location(s), and submit the test for App Review.
As a test best practice, be sure to consider the number of elements that are being changed in each variant. The more elements that are changed the harder it is to identify which change impacted the CVR.
Now the test has been live for a little while it’s time to measure the impact. Under App Analytics in App Store Connect, for each variant (treatment) App Analytics displays the number of impressions, the CVR, the CVR percentage improvement, and the confidence level compared to the original product page. This means that as soon as the test is launched, we are able to track (in real-time) the CVR performance of the new variants, against the other variants and the Original Product Page.
If the win is significant, and the Confidence Interval is +90%, it would be a good idea to replace the Original Product Page with the winning Treatment. The new variant is applied in a few clicks. Under the test name in App Analytics, simply scroll to the variant you want to implement and tap ‘Apply Treatment’. Now start the process again, iterating further on the winning variant, to optimize the Product Page as much as possible.
For a deep dive into PPO best practices, see this article by ASO Consultant Iryna Maniuk.
Testing Top Tip:
Think about the testing strategy already implemented on the Play Store. Do you intend to employ a similar strategy on iOS? Or, are there deeper learning opportunities here centered around different user needs based on device type and locale?
If so, the A/B testing approach on the App Store should be different from what’s being rolled out on the Play Store. Not only does this create a great wide window of testing, but it also allows marketers to learn more about their audiences whilst establishing iOS and Android conversion-centric screens. Furthermore, by having two strategies implemented across both stores, successful tests across one platform could inspire a new test on the other platform. Thus, accelerating learnings and conversions across both stores!
Custom Product Pages
Showcase different product pages to different audiences.
With Custom Product Pages (CPPs), developers can create multiple versions of their app’s Product Page (up to 35) to highlight different features of the app which may resonate with different audiences.
For example, different screenshots, previews, and promotional texts can be shown, then shared through a unique URL. This could drive more relevant traffic to the app by showing off more relevant features to more tailed audiences. With the ultimate intention of boosting the CVR and maximizing potential downloads.
It’s of course also possible to have CPPs across different locations. This may be because users in one location are more likely to convert based on one value proposition vs users in a second location.
When it comes to measurement and impact, developers are able to analyze all key metrics (impressions, downloads, CVR, etc) for each CPP in the App Analytics in App Store Connect.
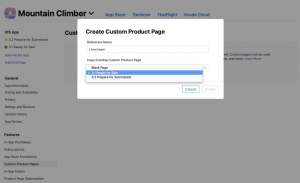
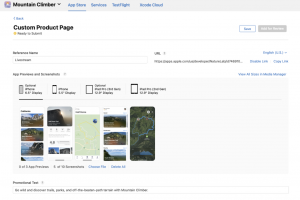
When building a new CPP, developers start with a copy of their Original Product Page. Then the screenshots, promotional text, and previews can be changed. Remember that all CPPs need to be reviewed before they go live, so it may take a bit of time before the customized variants are live in the App Store.
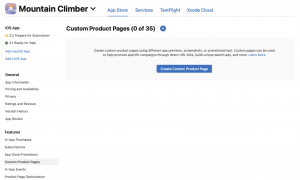
Creating a CPP is super easy. Head to App Store Connect, then under My Apps, hit Custom Product Pages. Here, tap Create, and enter a distinguishable Reference Name so this CPP is easy to identify later in App Analytics.
Once the Reference Name is done, modify the variables (screenshots, text, and preview) to align with the specific value proposition that is being focused on. Once complete, the unique URL link to this CPP will be created. Keep this, as it’s vital for driving the correct traffic to the app when it comes to marketing.
Once complete, click ‘Add to Review,’ though remember, edits to the CPP cannot be made whilst it’s in the review process.
Now it’s time to market the CPP. This is where the unique URL that was made earlier comes in. This can be implemented through any marketing channels and promotional communications, (email, social media advertising, etc), to drive the specific CPP traffic to the new page listing.
The new CPP cannot be found through searching on the App Store, but it may appear through editorial content on the Today, Games and Apps Tabs.
Now the CPPs are live, it’s easy to measure their performance. Under App Analytics, you’ll see key metrics including Product Page Impressions, Downloads, Redownloads, and CVRs to assess how impactful each CPP is at driving app downloads.
By using App Analytics, it’s also possible to analyze the retention data and average proceeds per user for each live CPP. This can then shape the strategies of other CPPs, or potentially inspire new CVR-centric PPO tests.
Finally, it’s of course also vital to contrast the performance of the CPP against the default product page and investigate how the user behavior differs based on what was shown to them in the App Store.
For a Phiture masterclass on how best to Optimize Custom Product Pages on iOS15, check out this article.
Testing Top Tip:
Where are your most active audiences? Why is the audience active in this location? Once identified, re-shape the CPP, and roll out across locations with less engagement. See this as an opportunity to understand what works in the top markets, and how this can inspire some of the emerging markets.
This can also be broken down by app features. Perhaps it’s time to highlight the main features of the app and create a CPP for each feature. Next, roll out the CPPs to learn which feature drives the most conversions. With this knowledge, the original Product Page can be influenced to maximize conversions over larger audiences!
In summary, In-App Events, PPO, and CPPs are additional ways to maximize user engagement and increase CVR. They provide three huge new opportunities to test your creatives and gain a deeper understanding of audience types to make apps more applicable to more people. With more testing, comes more learning – and ultimately a more optimized Product Page with a higher CVR, resulting in more downloads.
What next?
- For a Phiture masterclass on how best to Optimize Custom Product Pages on iOS15, check out this article.
- For a deep dive into PPO best practices, see this article by ASO Consultant Iryna Maniuk.
- To learn more about In-App Events, check out this deep dive put together by Phiture’s ASO Consultant Joy Staples.
- The long-awaited WWDC 2022 introduced a number of exciting updates of relevance to mobile growth professionals. As well as introducing the new MacBook Air and 13-inch MacBook Pro (now powered by the Apple M2 chip), Apple announced updates to iOS, iPadOS, macOS, and watchOS. In our summary, we shared the most exciting news related to iOS and what potential impact it could have on your app growth strategies, covering announcements about Benchmarks in App Analytics as well as App Store Connect updates.
- If you need specific ASO advice, you can reach out to us on ASO Stack and one of the Phiture team will be in touch!
Table of Contents