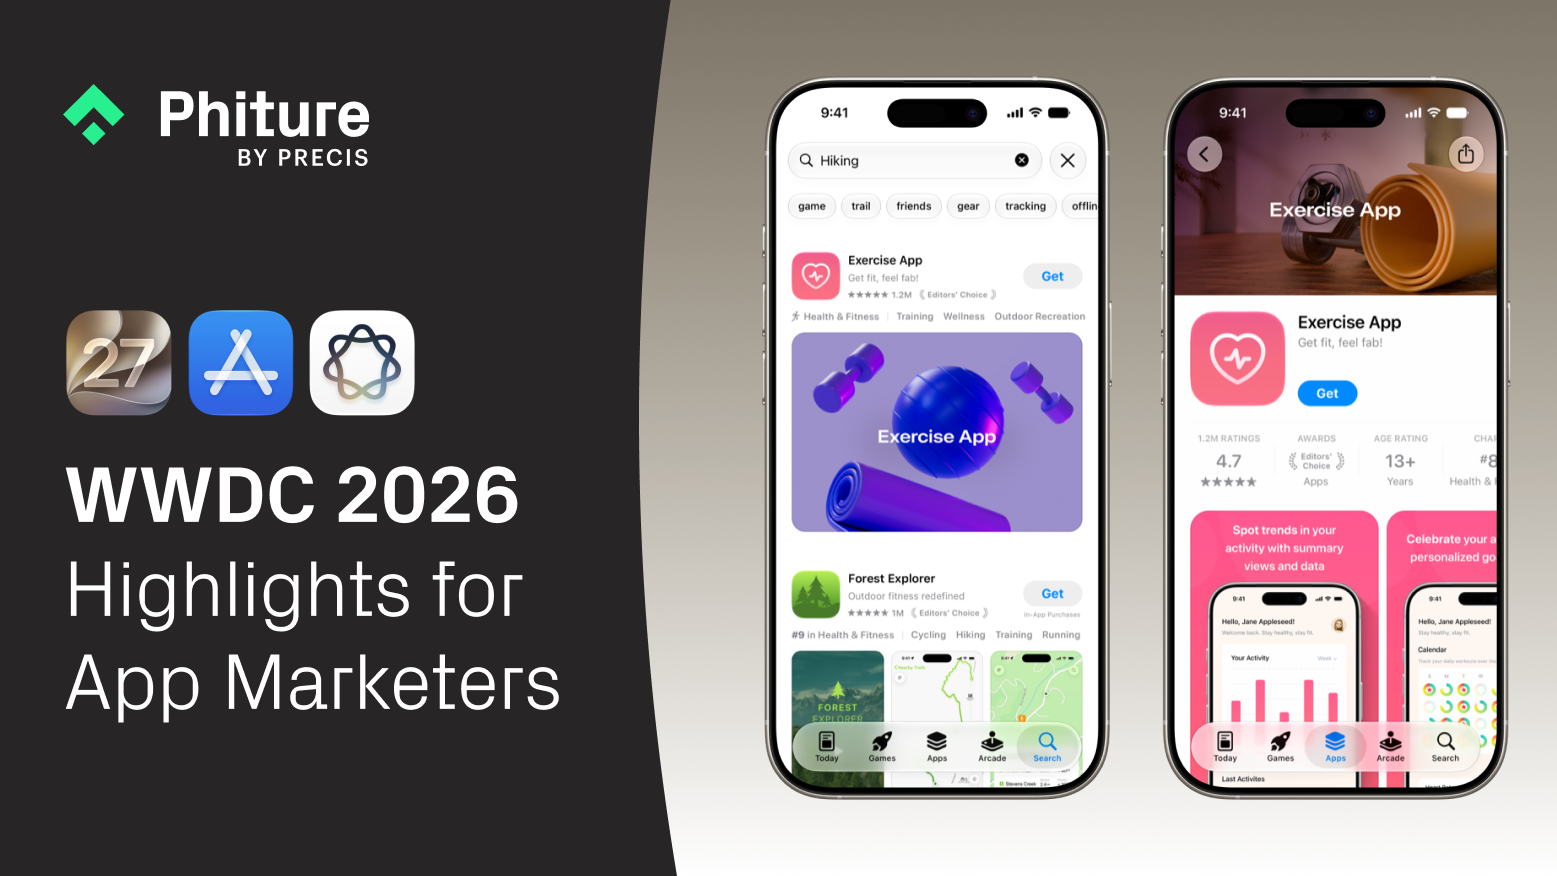
Successful Design QA for ASO Assets
A successful ASO asset launch has an often-overlooked step that, when excluded from the workflow, greatly diminishes the assets’ quality. Design doesn’t finish when assets are ready for handover and exported; App Store assets may be rejected or the client could come back with last-minute requests. And to avoid unnecessary export iterations, we’ve established a design quality assurance (QA) process; a series of steps to follow anytime a designer exports anything.
This article provides valuable insights into how we optimize our exported assets and teaches you how to perform design QA on yours.
What is Design QA?
QA, or quality assurance, is the vital process of reviewing designs and copy to mitigate any inconsistencies. It is the stage of development designed to catch any errors before they are released. The goal of quality assurance is to verify that the assets produced are as expected and to find and remove errors before they are committed and uploaded. A pixel-perfect output is not just the cherry on top, but is an essential part in your process.
When crafting assets, designers should take ownership of the production and also have a voice in the design check process. If we exclude quality assurance from our workflows, we’ll find ourselves in design debt. Design debt is an accumulation of small design errors that range from an extra line of pixels in your screenshots (grounds for rejection on the App Store) to using the incorrect translations. These small details can quickly pile up if they’re not spotted early, but an effective QA process will eliminate these errors as early as possible.
Why Design QA?
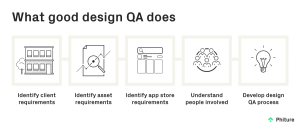
Completing design QA benefits our asset flow in many ways. When we produced a significant number of assets without design QA, we have often faced rejected uploads to the app stores due to small errors like export size, naming convention, and caption mistakes. If design QA occurs before further development, the designer will be aware of any issues early on. It is very likely that if your designs go unchecked, it will boomerang additional work back to you and you won’t meet your deadlines. By properly setting the process up, you ensure quality output.
We noticed that after practicing design QA on several projects:
- Design QA keeps designers and translators in the loop about technical and content issues;
- Sheds light on unforeseen bugs;
- Helps build the correct vision of your assets as the project develops;
- Saves time and additional work;
- Makes workflows more efficient;
- Produces quality work;
- Builds trust with clients.
Where does Design QA fit in?
Traditionally, asset development begins with gathering requirements, then proceeds to the design stage, after which it’s handed off to another team or client, and the assets are only released after their approval. The design QA process takes place after the design stage and just before handoff. If design QA takes place too late or is not even part of the flow, you may find yourself and the team having to re-do some work later, which can cost time and postpone publishing dates.
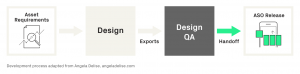
Preparing Developer’s handoff
Handoff is what we consider the holy grail because, if not done correctly, chaos may bite you just before the deadline and the client’s expectations won’t be met.
We upload our exports to the internal Google Drive folder system where we do our design QA first with the sheet that I share with the people who will be performing QA. I also provide design QA specs documentation.
Design specifications consist of a document where a designer details their design, documenting naming conventions, export sizes, conditions etc.. Even though it takes some time to prepare design specifications like this, the documentation will serve as your source of truth when performing quality checks. Documentation gives a clear path for the whole QA team. I have created lists below to show you what these specifications usually look like for us:
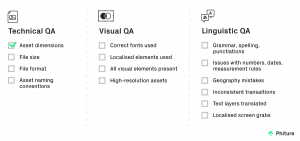
Technical check
- Provide reference to the perfect asset (for ASO we usually use EN-US market as a reference with which we can compare all the other exports and markets);
- Check dimensions of all exported assets (we reference sizes for each device’s assets);
- Check naming of the assets and folders (give references for asset naming).
Visual check
- Check if all elements (e.g. graphic elements, photography, mockups, screen grabs) on all exported images are high quality and not pixelated;
- Check if all screen grabs are localized;
- Check if all exported images have the necessary elements;
- Check if certain elements from the set are not aligned properly, are jumping when scrolling, poorly animated elements…;
- Check if all necessary text is translated (e.g. captions and user interface of the app).
At Phiture, we came up with a solution for the design team to use an iterative design QA process that involves many cycles.
Steps for Design QA for ASO Assets

Design team sets deadline
Setting a deadline and estimating the time for design QA will help us deliver possible fixes in time.
Exporting assets for QA
When a designer exports the final assets, they are ready for QA.
Technical QA
Designers do a quick check if there are obvious QA issues for all exports.
Prepare issues sheet
Set up a spreadsheet where you will be tracking possible issues.
Brief for team members
We send written instructions to members who will be doing QA of what exactly they need to check. We share a spreadsheet to track issues.
Issues are noted in the sheet
Feedback is provided in the sheet.
Applying fixes to the assets
When a designer implements fixes from the sheet, it must be marked as done/ignored. If we ignore the noted issue, we also comment on why we ignored it.
Design QA
Before sending screenshots to the client/consultant, the designer does a final design QA check.

Steps can be adjusted to meet your resources and needs. You could be a motion designer or brand designer and adapt the design QA process to make it yours.
Tips for your Design QA Process
I have built and sent off various digital products, from mobile applications screens, to webpages, to thousands of images exported in one batch. The following tips have helped me and my team perform design QA by articulating the design intention and reporting issues.
Document process
In order to clarify how one can do design QA, you need to be descriptive with your QA process. Include any references or even video instructions to set an example of what results you want to achieve. Go through the example and follow the “ideal reference.” Making a visual representation and writing detailed instructions to follow will bridge the gap between you and all who will do design QA. Document the bugs that you find and steps to reproduce the error. Fixing one issue might cause other bugs. By documenting issues early on it might uncover potentially larger unseen issues.
Start design QA early enough
If you wait to complete design QA towards the end of the handoff it may delay the launch date. Start early enough so you can implement fixes found. If design QA is postponed, then many assets could have issues, potentially causing other unforeseen delays.
Don’t rush, ask for help
We noticed that finding bugs is even more efficient if someone from another project does design QA with you. When you look at your assets for months it is more likely that you will miss those issues. Teach someone else to do QA and let them check the assets. Give them enough time to go through all of them. Tight time constraints will more likely cause stress and they will lose attention.
Be as precise as possible
Design QA is the process of seeing assets through a different lens. We collectively check if all acceptance criteria are met. For example: “Are all naming conventions of the images correct? As a designer, I am examining how the layout appears. Is there something missing in my exports? Are all the captions and app features translated accordingly?” Our files in Figma (our standard design software) can grow to be quite extensive, resulting in poor renderings as the software tries to grapple with large file sizes.
Spread the quality
To make the job easier for everyone, I made a central document hub article for all designers to set up the design QA process for themself. Now the whole design team is familiar with this process and practices it every time any type of project is finished.
Conclusion
When working on designs, designers need to verify that the assets were executed and implemented as intended. Design QA results efficiently created designs.
The design QA could be a challenge at first, but we should keep in mind that it is an important part of great asset development. Always remember, it is better to do high-quality work once than numerous fixes for each iteration
Inserting design QA into your workflow will help the team move their tickets more quickly. It also ensures design integrity throughout, creating a more efficient process and timely product launch with greater success.
Table of Contents