Intro
PressPlay by Phiture automates the creation, deployment and analysis of A/B tests on the Google Play Store. It uses generative AI to create visual assets in huge volumes, leveraging Phiture’s decade-long expertise in ASO. These assets, in the form of icons, feature graphics and screenshots, are then tested on the actual Google Play Store, powering tens of simultaneous experiments, with close to none human intervention.
This is enabling gaming companies like Wildlife Studios and Lockwood Publishing to achieve millions of additional projected app installs, in just a few months.
However, one of the hardest problems in AI is reliable consistency. It’s one thing if you’re prototyping creative ideas in AI, but to actually publish an AI-generated image requires a level of consistency that’s hard to achieve with prompting alone. The image isn’t going to be approved if it doesn’t conform to the style used across a company’s brand assets.
Phiture came to me with this problem – having done remarkable work to automate the testing of new brand assets with their PressPlay tool, the new bottleneck was creating new assets to test. AI-generated assets weren’t cutting it, because it was an onerous trial-and-error approach to match a client’s style, and even then they were always noticeably off. If they could automate the generation of assets, PressPlay could automatically cycle through many iterations of tests using AI to generate new ideas, driving growth for their clients many times faster than would be otherwise possible.
Thankfully I had written in my prompt engineering book (published June 2024 through O’Reilly) about creating consistent characters with AI, including fine-tuning a model based on a specific style or object. In this post I’ll walk through how I approached it, so you can see what’s possible with AI.
Fine-tuning with Dreambooth
I’ll start with the hardest technique, because it’s what gets the best results. Dreambooth is a training technique you can use on open-source models like Stable Diffusion XL, which actually changes the parameters in the model – it ‘learns’ about the concept you teach it. That concept is typically either a style or subject, of which you need 5-30 images to upload for the model to train on. There is another popular technique for fine-tuning called LoRA, but I use Dreambooth because it gets better results on faces.
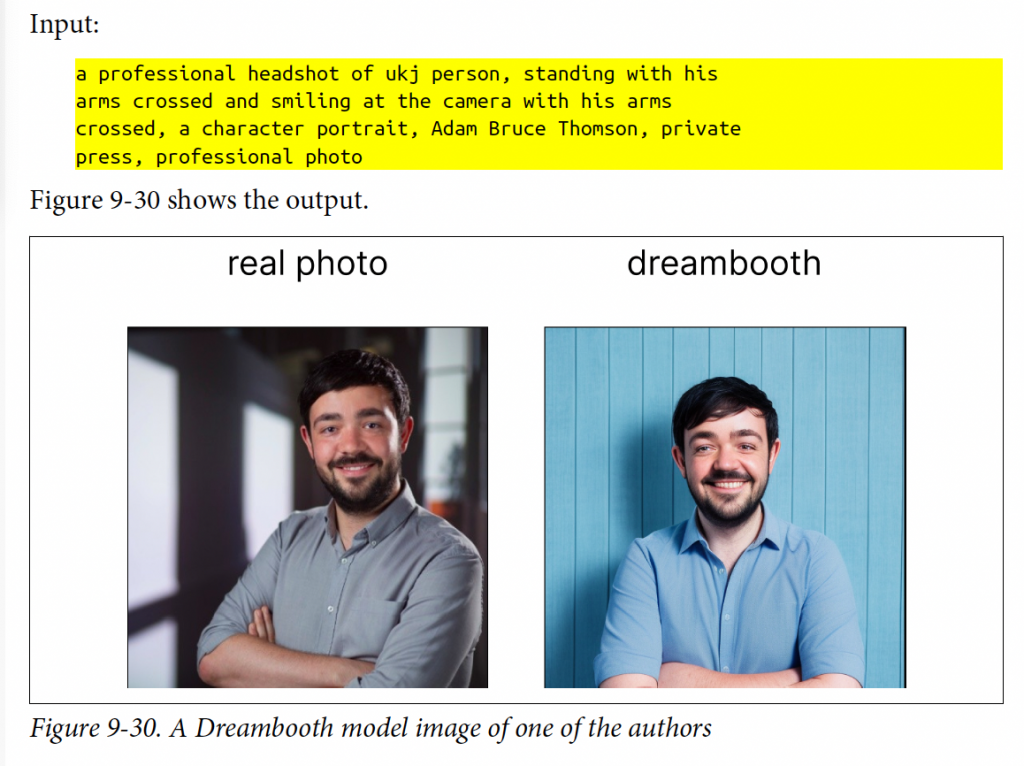
Here’s an example from my book, where I trained Stable Diffusion 1.5 to generate images of myself:
There are plenty of options online in terms of tutorials you can follow (I like this one), but I would recommend some technical ability if you’re going to try this method. You probably won’t have to write any code, but you will have to know how to run it. The good news is that you don’t need the latest M3 Macbook or gaming PC with access to a GPU (graphics processor used by AI models), as Google’s Colab Notebooks offer access to GPUs for free or very cheap (~$15 a month), depending on which model you’re using.
Note: you can also try out Replicate, which I’ve had great experiences with before. However, as of June 2024 their customer service team admitted to me that their training methods were somewhat out-of-date relative to the results you can get within Colab, and they will be revisiting this feature.
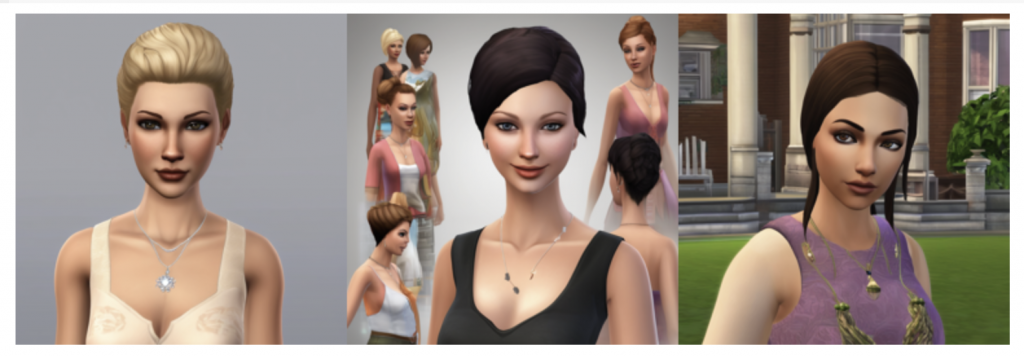
Here’s the training data we uploaded on behalf of the client: ~30 cut out images with no background, of a specific character in the game Avakin Life in different poses and positions:
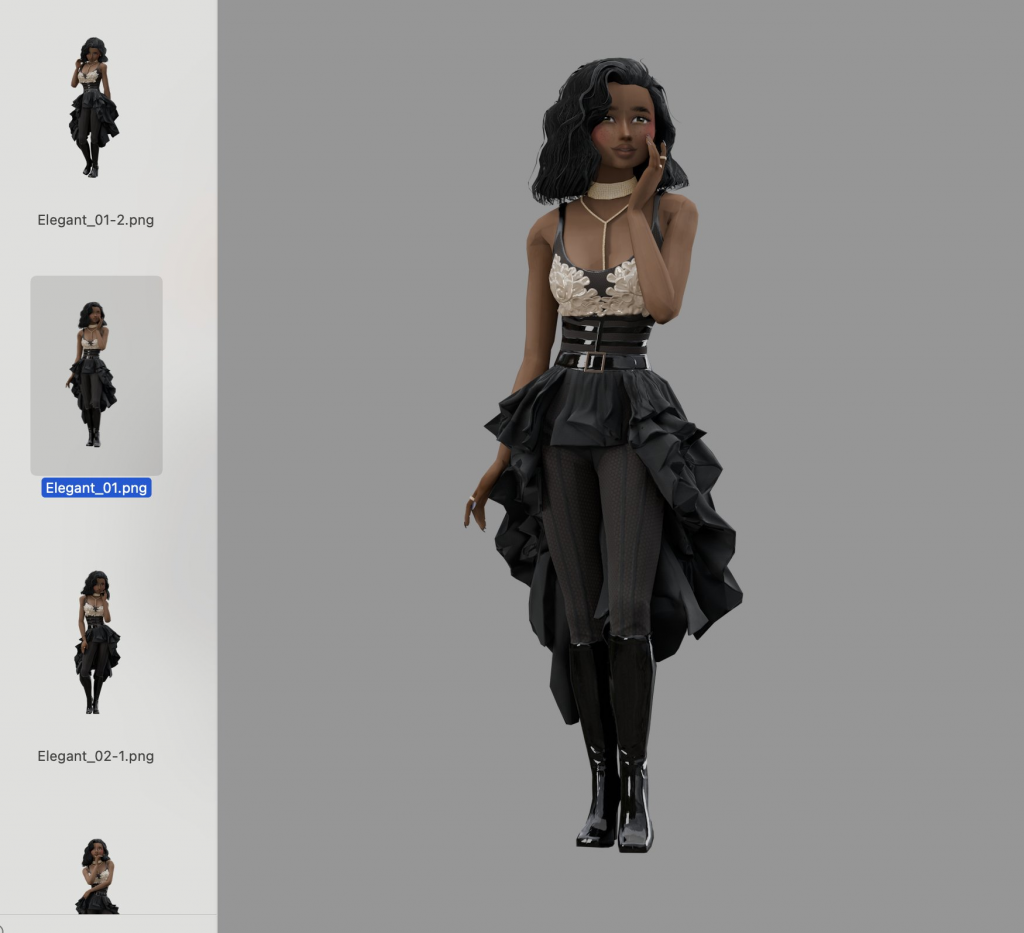
The training only took around 15 minutes to complete, and at the end we had a new set of model weights we could prompt with the word “UKJ” (a made up word, that the new model associates with our images):
Compare this to what we got when we prompted the normal Stable Diffusion XL model that didn’t know about our character and brand style:
When Phiture used fine-tuned models to automatically deploy icon tests created by PressPlay’s generative AI, Avakin Live saw remarkable results. Ouni Kwon, Senior Marketing Director at Lockwood Publishing said: “Phiture’s PressPlay has been instrumental in scaling our experimentation efforts and deepening our understanding of how to effectively communicate our brand to players. We are seeing successes where we didn’t expect to and have been able to apply the learnings across other areas in our marketing while staying true to our brand identity.”
As you can see, fine-tuning makes an astonishing difference in the quality of the assets, and really nails the client’s unique style. AI-generated assets aren’t replacing human designers any time soon, and if you have good quality assets to use you should. However, AI being able to fill the gap in scenarios where you need assets over and above what would be possible for your team to produce, is a powerful edge. You can always take the winning variants from AI generated asset testing and then make human versions of them later, to achieve stronger performance in less time.
Deep-dive: Running Stable Diffusion XL In Google Colab
If you don’t code, you can stop here, because we’re going to go through how this technique works. If you have a developer in your team, you could send this post to them and they should be able to replicate my results in half an hour.
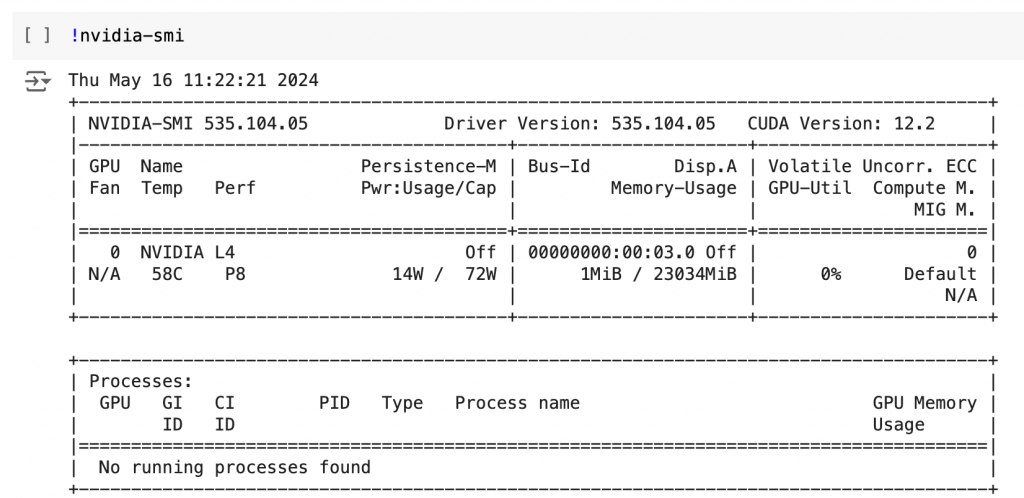
First, you need to check you have an Nvidia GPU, which you can accomplish by typing !nividia-smi and pressing Option + Enter on a Mac, CTRL + Enter on a PC. If you don’t have a GPU then you can assign one by clicking the dropdown in the top right corner, and choosing ‘Change runtime type’, before selecting one of the GPUs (I used the L4 one).
Next you need to install the diffusers library by HuggingFace, which is what helps you run Stable Diffusion: %pip install --upgrade diffusers[torch] -q
If you want to run the base version of Stable Diffusion XL, you can run it with the following code. Stable Diffusion is open-source, so it’s useful to be able to run it locally like this, and all you have to do is run on the code. Just change the prompt to be whatever it is you are trying to create:
from diffusers import DiffusionPipeline, AutoencoderKL
import torch
from PIL import Image
def image_grid(imgs, rows, cols, resize=256):
assert len(imgs) == rows * cols
if resize is not None:
imgs = [img.resize((resize, resize)) for img in imgs]
w, h = imgs[0].size
grid_w, grid_h = cols * w, rows * h
grid = Image.new("RGB", size=(grid_w, grid_h))
for i, img in enumerate(imgs):
x = i % cols * w
y = i // cols * h
grid.paste(img, box=(x, y))
return grid
vae = AutoencoderKL.from_pretrained(
"madebyollin/sdxl-vae-fp16-fix",
torch_dtype=torch.float16
)
pipe = DiffusionPipeline.from_pretrained(
"stabilityai/stable-diffusion-xl-base-1.0",
vae=vae,
torch_dtype=torch.float16,
variant="fp16",
use_safetensors=True,
)
pipe.to("cuda");
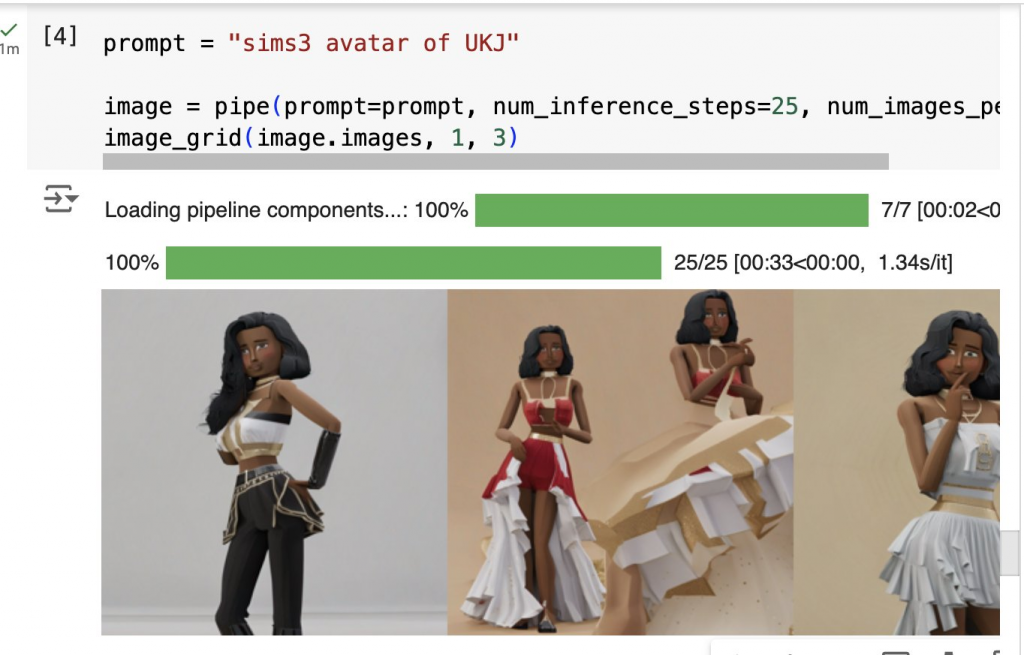
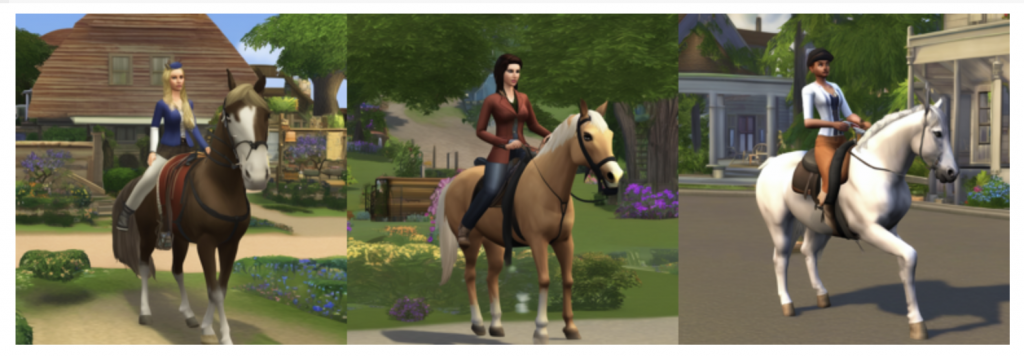
prompt = "sims3 avatar of a woman riding a horse"
image = pipe(prompt=prompt, seed=42, num_inference_steps=50, num_images_per_prompt = 3)
image_grid(image.images, 1, 3)
We found the closest prompt to the client’s style we could find was evoking the name of sims3 and specifying it was an avatar. Here’s the resulting set of images:
Here’s what the code does, step-by-step:
- Imports and Setup:
from diffusers import DiffusionPipeline, AutoencoderKL: Imports the DiffusionPipeline and AutoencoderKL classes from the diffusers library. These are used for setting up and using the diffusion model.import torch: Imports the PyTorch library, which is used for tensor operations and as the backend for the model computations.from PIL import Image: Imports the Image class from the Python Imaging Library (PIL), used here to handle image operations like resizing and merging into a grid.
- Function Definition
image_grid(imgs, rows, cols, resize=256):- This function takes a list of image objects (
imgs), the desired number of rows and cols for the grid, and an optionalresizeparameter to adjust the size of each image. assert len(imgs) == rows * cols: Ensures that the number of images matches the expected number of grid slots.- Resizing images (if
resizeis notNone): Resizes each image to the specified square dimensions. - Grid dimensions are calculated based on the number of columns (
cols), rows (rows), and dimensions of the first image. - A new blank image
gridis created with the computed width and height. - Images are placed into this grid in row-major order using a loop that calculates the position for each image.
- The function returns the final image grid.
- This function takes a list of image objects (
- Model and Pipeline Setup:
vae = AutoencoderKL.from_pretrained(...): Loads a pre-trained autoencoder model. This model is specialized for handling images in a reduced precision (float16) for efficiency.pipe = DiffusionPipeline.from_pretrained(...): Sets up the diffusion model pipeline with the previously loaded autoencoder, specifying model settings such as precision and safety features to manage GPU memory efficiently.
- Moving the Pipeline to GPU:
pipe.to("cuda"): This command moves the pipeline’s computations to a GPU (if available), allowing for faster processing.
- Generating Images:
prompt = "sims3 avatar of a woman riding a horse": Defines the text prompt based on which the images will be generated.image = pipe(prompt=prompt, num_inference_steps=50, num_images_per_prompt=3): Generates images using the defined pipeline and settings. The settings indicate that 50 inference steps should be used, and three images should be generated from the prompt.
- Displaying the Generated Images in a Grid:
image_grid(image.images, 1, 3): Calls theimage_gridfunction to organize the three generated images into a grid with one rows and three columns.
Running Dreambooth Fine-Tuning In Google Colab
Now we have established a baseline, we can run the Dreambooth training process to fine-tune the model on our data. We’re going to use autotrain, which is another package by HuggingFace:
%pip install -U autotrain-advanced
Make sure you restart the Colab Notebook now, to free up memory from running the base version of Stable Diffusion XL, and to apply the autotrain library. The final thing you have to do before running training is upload the images to Colab. On the left-most menu, click the file icon, right click then click ‘New folder’, and call it image_training. Upload the images you want to train on to this folder by right clicking the ellipses on the right hand side of the folder, and clicking upload.
Note: You want to upload your image files to the folder without opening it, or you’ll run into an error – it will add an ipython-checkpoint file which annoyingly causes an error with the training script. If you accidentally open the folder then delete it, and try again with a different folder name.
Finally, you can run training, which can be done with the following code:
!autotrain dreambooth \
--train \
--model "stabilityai/stable-diffusion-xl-base-1.0" \
--project-name "DreamboothSDXL" \
--image-path "image_training" \
--prompt "photo of UKJ" \
--seed 42 \
--resolution 1024 \
--batch-size 1 \
--num-steps 500 \
--lr 1e-4 \
--mixed-precision fp16
Here’s what each parameter means:
!autotrain dreambooth: This initiates theautotraintool specifically for the Dreambooth task, which is a method of personalizing generative models (like image generators) to specific styles or subjects.--train: This flag specifies that the operation is a training run, as opposed to other possible operations like evaluation or inference.--model "stabilityai/stable-diffusion-xl-base-1.0": This specifies the model to be used for training. In this case, it is using thestable-diffusion-xl-base-1.0model provided by Stability AI, which is likely a large-scale version of the popular Stable Diffusion image generation model.--project-name "DreamboothSDXL": This sets the name of the project under which the training run will be saved. It helps in organizing and retrieving the training run data later.--image-path "image_training": This option points to the directory where the training images are stored. These images are what the model will use to learn from during the training process.--prompt "photo of UKJ": This specifies the text prompt associated with the training images. The model will learn to associate this prompt with the visual content of the images in the specified directory.--seed 42: This sets a specific seed number for the random number generator used in the training process. This is important for reproducibility, ensuring that training runs are consistent if they are started with the same seed.--resolution 1024: This determines the resolution of the images that the model will generate during training. Here, it is set to 1024 pixels, which implies a resolution of 1024×1024 pixels.--batch-size 1: This sets the batch size to 1, meaning the model processes one image at a time during the training. This is often used for more memory-intensive models or when GPU memory is limited.--num-steps 500: This specifies the number of training iterations or steps the model will run through. More steps generally lead to better learning but increase training time and resource consumption.--lr 1e-4: This sets the learning rate to 0.0001. The learning rate controls how much the model weights are adjusted during training in response to the error rate. Smaller learning rates can lead to more stable but slower training.--mixed-precision fp16: This flag enables mixed precision training using the fp16 (16-bit floating-point) format, which can speed up the training process by reducing the computational demand on the GPU.
The training should take about ten to fifteen minutes, and when it’s done you could go into the files and download the pytorch_lora_weights.safetensors file, to use in AUTOMATIC1111’s Stable Diffusion Web UI, ComfyUI, or most other popular Stable Diffusion user interfaces. However, you also just run the new model weights directly in Colab, like we did with the base model.
from diffusers import DiffusionPipeline, AutoencoderKL
from PIL import Image
import torch
def image_grid(imgs, rows, cols, resize=256):
assert len(imgs) == rows * cols
if resize is not None:
imgs = [img.resize((resize, resize)) for img in imgs]
w, h = imgs[0].size
grid_w, grid_h = cols * w, rows * h
grid = Image.new("RGB", size=(grid_w, grid_h))
for i, img in enumerate(imgs):
x = i % cols * w
y = i // cols * h
grid.paste(img, box=(x, y))
return grid
vae = AutoencoderKL.from_pretrained(
"madebyollin/sdxl-vae-fp16-fix",
torch_dtype=torch.float16
)
pipe = DiffusionPipeline.from_pretrained(
"stabilityai/stable-diffusion-xl-base-1.0",
vae=vae,
torch_dtype=torch.float16,
variant="fp16",
use_safetensors=True,
)
pipe.to("cuda");
pipe.load_lora_weights("DreamboothSDXL", weight_name="pytorch_lora_weights.safetensors")
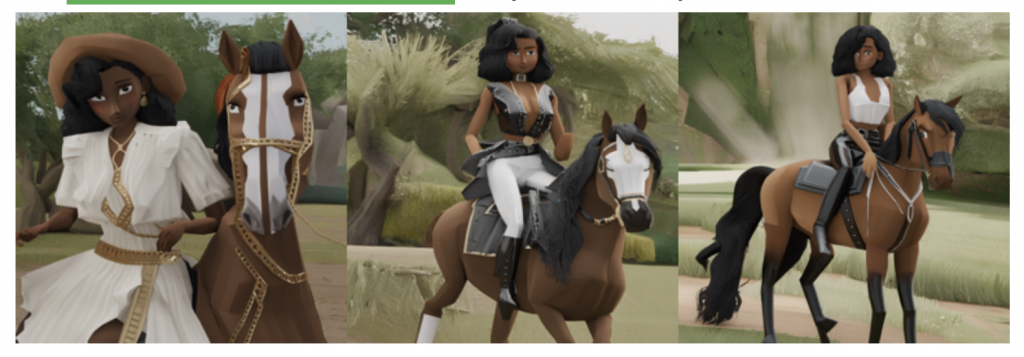
prompt = "photo of UKJ riding a horse"
image = pipe(prompt=prompt, seed=42, num_inference_steps=50, num_images_per_prompt = 3)
image_grid(image.images, 1, 3)Here are the resulting images:
Most of this is the same as before, but there are two changes:
vae = AutoeratorKL.from_pretrained(...): Loads a specific pre-trained version of an autoencoder, set to operate in float16 for efficient GPU computation.pipe.load_lora_weights("DreamboothSDXL", weight_name="pytorch_lora_weights.safetensors"): This line loads additional specialized weights into the model, to use our fine-tuned model weights.
As we have demonstrated, employing techniques like Dreambooth for fine-tuning AI-generated brand assets can significantly elevate their relevance and consistency with existing brand aesthetics. For companies like Phiture, building advanced AI tools like PressPlay can offer a real edge in improving performance through creative testing. Embracing these technologies not only enhances efficiency but also opens new possibilities for creative innovation in digital marketing.
Table of Contents